Buying guide
One-bag weekend travel: volume, weight and packing layout
One-bag weekend travel succeeds when the packed bag fits the booked allowance, carries comfortably and opens in a useful order. Litres alone cannot answer those questions.
Two bags with similar stated capacity may have very different shapes, empty weights, openings and internal obstructions, so the same clothes and technology can behave differently in each.
Use the weekend packing list to decide what the trip requires.
This guide then turns that list into a physical layout: how much space each group takes, where heavier items go, what must be accessible and what changes on the return journey.
The dimensions and masses in the worked examples are illustrative rather than measurements of particular products.
Begin with the outside limits
Write down the permitted dimensions and weight for the bag included in your booking. Check every operating carrier and leg, including a separately booked connection.
Do not assume the words cabin bag describe the same allowance everywhere, or that a handbag or laptop sleeve can always be carried separately.
As a current example checked in September 2026, easyJet's cabin-bag page lists its small under-seat bag at up to 45 × 36 × 20cm, including handles and wheels.
This example demonstrates why external measurements matter; it is not a universal airline standard. Recheck the carrier's own page and your booking before each journey.
Measure the bag when packed. A soft front pocket can extend beyond an otherwise compliant shell, and a bottle in a side pocket can increase width. Include fixed handles and any external attachment in the assessment.
A manufacturer's empty-bag dimensions are a starting point, not proof of the final travel shape.
Litres describe volume, not guaranteed packing space
The volume of a rectangular box in litres is length × width × depth in centimetres divided by 1,000. A hypothetical 40 × 30 × 20cm box is therefore 24 litres.
This is useful arithmetic for comparing envelopes, but a real bag has seams, padding, curves, pockets and possibly a frame or wheel assembly.
If the same bag's practical internal envelope were 37 × 27 × 17cm, that rectangular estimate would be about 17 litres.
The difference does not mean the manufacturer has necessarily measured incorrectly; its stated capacity may use a different method and include other compartments. It does mean you should not plan a load solely by adding nominal litre labels.
Long or rigid items make shape especially important. A laptop sleeve may fit the stated capacity while failing to fit the opening. A pair of shoes can prevent a shallow bag closing even when soft clothing could fill the same volume.
Record the longest, widest and least compressible items before choosing a bag shape.
Compare usable shapes with the same contents
| Bag characteristic | Potential advantage | Physical compromise to test |
|---|---|---|
| Rectangular clamshell backpack | Main contents visible when fully open | Needs space to open and may encourage deep packing |
| Top-loading backpack | Useful access in narrow spaces | Bottom items can require unpacking above them |
| Small wheeled case | Reduces carrying on suitable smooth routes | Wheels and handle structure occupy space and add mass |
| Soft holdall | Flexible around awkward items | Shape and weight distribution can change when loaded |
| Slim laptop-style bag | Easy access to flat equipment | Bulky clothing or footwear may distort the profile |
Compare using your real packing groups, not an empty-bag inspection. Put the same clothing bundle, toiletries and technology into each candidate where a trial is possible.
Notice whether a thick pocket steals depth from the main compartment and whether the laptop compartment remains usable once the bag is full.
The backpack-versus-wheels decision tool can help frame the route choice. Smooth station platforms and long walking sections create different demands.
Wheels do not eliminate carrying on stairs, and a backpack is not automatically comfortable at any weight merely because it leaves your hands free.
Measure packing groups instead of every sock
Start with four or five groups: clothing, toiletries, technology, quick-access essentials and any bulky exception such as shoes. Bundle each group as it will actually travel, then note approximate dimensions and mass.
This keeps the process manageable while revealing the item that dominates the layout.
For soft groups, the dimensions are approximate and change under pressure. Measure without crushing them to an unrealistic density. A cube that needs your full body weight to close will not be pleasant to repack on a small hotel bed.
If compression is part of the system, include the actual compression bag and its weight in the test.
Rigid objects deserve exact clearance checks. Measure a laptop in its sleeve, a camera in its case and a toiletries bottle with its cap. Check opening width as well as compartment dimensions.
A compartment can be large enough internally but awkward to load because its zipper stops short of the corners.
A 24-litre planning example
Imagine a backpack described as 24 litres with an internal main compartment that accepts a clothing cube approximately 30 × 24 × 10cm. The cube's rectangular envelope is 7.2 litres.
Add a toiletries pouch of 20 × 12 × 6cm, a technology pouch of 18 × 12 × 5cm and a slim document group.
The toiletries envelope is 1.44 litres and the technology envelope 1.08 litres. Adding those figures gives 9.72 litres before documents and other items, but that total does not guarantee a neat fit.
The cube may block the bottom of a pocket, and the rounded pouches may leave gaps that cannot hold the remaining objects.
Place the cube in the bag, then try the other groups around it. Use flexible clothing only where it remains accessible and does not create hard pressure points. Keep the charging pouch removable if it is needed during travel.
Photograph the successful arrangement for your own reference, then repack from that photograph without elaborate folding.
A weight budget exposes different problems
| Hypothetical component | Example mass |
|---|---|
| Empty backpack | 0.9kg |
| Clothing and organiser | 1.8kg |
| Toiletries | 0.4kg |
| Laptop and protective sleeve | 1.6kg |
| Charger, cables and adaptor | 0.4kg |
| Documents, phone and small essentials | 0.4kg |
| Empty bottle and other small items | 0.3kg |
| Illustrative total | 5.8kg |
This total is arithmetic, not an airline allowance or a promise of comfortable carrying. Add water, purchases, footwear or a heavier bag and the result changes quickly.
Use your own measured masses in the carry-on packing planner, then compare the total with the actual booking limit.
The laptop is the largest single equipment group in this example. If the trip does not require it, leaving it behind changes the load more than switching to several tiny toiletries containers.
If it is essential, protect its space and reduce optional items elsewhere. Packing decisions should follow the trip's purpose rather than a universal minimalist rule.
Put access in the right order
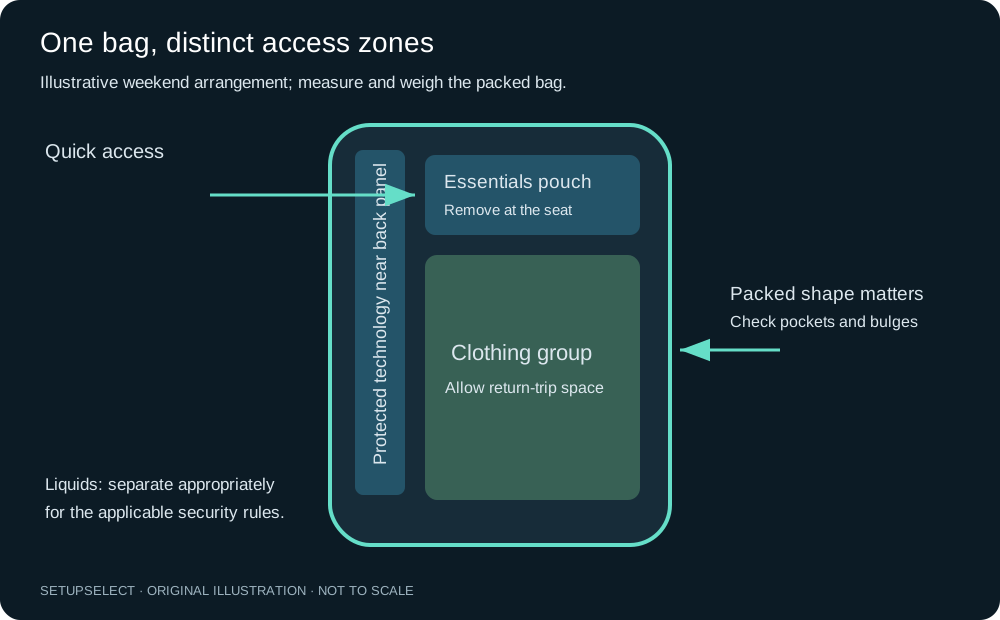
Think through four moments: leaving home, security, travel at the seat and arrival. Documents and a phone may be needed repeatedly; toiletries and electronics may need to be presented at security; a layer or headphones may be needed later.
Put each group where it can be reached at the appropriate stage without emptying the bag.
Follow the applicable security instructions rather than assuming every airport uses the same process. GOV.UK's hand-luggage guidance is a starting point for UK departures, while airports and airlines provide journey-specific requirements.
A fast-access pocket is useful only if its contents can actually be removed when requested.
Do not place all valuable items in the easiest external pocket simply because it is convenient. Balance access with the bag's security features and your ability to keep it under control.
Avoid leaving documents or electronics in an open bag while repacking another compartment.
Place dense items thoughtfully
In a backpack, test heavier equipment close to the supported back area, with suitable protection and no hard edge pressing against you. The bag's construction and manufacturer instructions determine the appropriate compartment.
Do not wedge a heavy charger against a laptop screen merely to fill a gap.
Keep left-to-right loading reasonably balanced. A full bottle on one side and nothing on the other may make the bag feel different during a longer walk.
Try the bag with the water state you expect at each part of the journey, and move items within the supported layout if one shoulder feels disproportionately loaded.
For a holdall or wheeled case, inspect how the load shifts when lifting, tilting and opening it. Secure items using the intended straps or compartments.
A carefully packed flat layout can collapse when the bag is carried upright, leaving toiletries and small objects at the bottom of the opening.
Make footwear earn its volume
An extra pair of shoes is often the hardest shape in a weekend bag. Before packing it, confirm that the itinerary requires a genuinely different function or dress standard.
If one suitable pair can serve the journey, removing the spare may solve the capacity problem without buying a larger bag.
When a second pair is necessary, pack it cleanly and protect clothing from dirt. Use an appropriate light bag rather than automatically adding a bulky structured shoe case.
Fill harmless empty space only where doing so will not damage the shoe or the packed item. Keep footwear separate from food and toiletries that could leak.
Treat wet or dirty return footwear as a different packing condition. The outward layout may rely on placing a layer around clean shoes, which becomes unsuitable after rain.
Reserve a separation method and enough space to repack without contaminating the rest of the bag.
Do not confuse compression with removal
Compression can reduce the space occupied by some soft clothing, but it does not reduce mass. It may also create a dense block that is less flexible around the bag's shape.
Compare compressed and ordinary packing with the same contents, checking the final external dimensions and how quickly you can retrieve one item.
Packing cubes mainly provide grouping. A single clothing cube may make a weekend bag easier to use, while several small cubes can introduce unnecessary fabric and zips. Choose the smallest number that solves your actual organisation problem.
The under-£50 essentials guide includes allocations that allow organisers to remain optional.
If the only way to close the bag is extreme compression, review the list before upgrading the equipment. Remove duplicated layers or accessories that have no identified use.
Keep essential medical, accessibility and trip-specific requirements intact; reducing luggage should support the trip rather than make it less workable.
Test the carrying route, not just the mirror
Wear or carry the packed bag for a realistic period, including stairs and the type of walk your journey involves. Adjust straps according to the manufacturer's instructions.
Check whether you can reach a ticket, put the bag down and lift it again without awkward handling. A five-second try-on does not expose every pressure point.
Try the outer layer you will actually wear. Strap comfort can change between a thin shirt and a coat. Check whether loose straps catch on doors or drag, using the intended strap keepers where provided.
If a bag is uncomfortable before the trip, do not assume familiarity will solve a poor fit.
For wheels, try lifting over a threshold and carrying on stairs. Inspect handle movement with the bag fully loaded, and check that it stands stably when parked.
These practical observations are more useful than treating a particular empty weight or capacity label as a complete verdict.
Preserve a return-journey margin
Leave enough flexibility for used clothing, imperfect folding and small legitimate additions. This does not require a fixed percentage; it requires a repacking trial that reflects how you will actually leave the accommodation.
Close the bag without recreating a meticulous sequence that took half an hour at home.
Keep a light laundry separation method and decide where damp items would go temporarily without damaging electronics or clean clothing. Dry items appropriately when possible rather than sealing them away for prolonged storage.
A one-bag plan should account for the condition of the contents as well as their original volume.
Before leaving the accommodation, restore the access order for the journey: documents, permitted security items and seat essentials. Reweigh when additions make the allowance uncertain.
The bag's outward compliance does not automatically carry over after purchases or changed packing.
One-bag layout questions
Is a 30-litre bag always better than a 20-litre bag? No. The larger bag may exceed your booked dimensions, weigh more empty or invite unnecessary packing. Compare usable shape, required contents and the actual route. Capacity is one input to the decision.
Can a soft bag be larger if I do not fill it? The relevant requirement is the carrier's actual size policy and the packed bag's compliance. Some soft bags compress, while frames, padding and fixed panels do not.
Do not rely on force or a theoretical empty measurement.
Should the laptop go at the bottom? Use the compartment designed for it and follow the bag's instructions. Protect it from impacts, liquids and pressure from dense objects. Convenience should not lead to placing a charger against a vulnerable screen.
What if I need formal clothing? Plan the required outfit first using the business-trip guide, then test folding and arrival condition.
A weekend one-bag arrangement may need a different shape or allowance when the dress requirements change.
How do I know the system is finished? You can carry it comfortably, retrieve essentials, comply with the booked allowance and repack it in ordinary conditions.
If one of those tests fails, adjust the list, layout or bag rather than judging success only by whether the zip closes.
Continue researching