Buying guide
What size desk do you need for two 27-inch monitors?
Two 27-inch monitors usually make a 140–160cm desk easier to arrange than a 120cm desk, but the diagonal size is not enough to guarantee fit. Measure both monitor housings, their stands, the angle between them and the equipment that must remain on the surface.
A 120cm desk can work in some arrangements; it should be treated as a measured exception rather than a universal recommendation.
The useful question is not simply whether two screens can balance on a desktop. You need somewhere for the keyboard, mouse, hands, cables and the occasional document, together with a comfortable view of the screen you use most.
This guide works through those decisions using transparent planning examples. The dimensions are illustrative, not measurements of products we have personally tested.
Start with physical width, not the screen diagonal
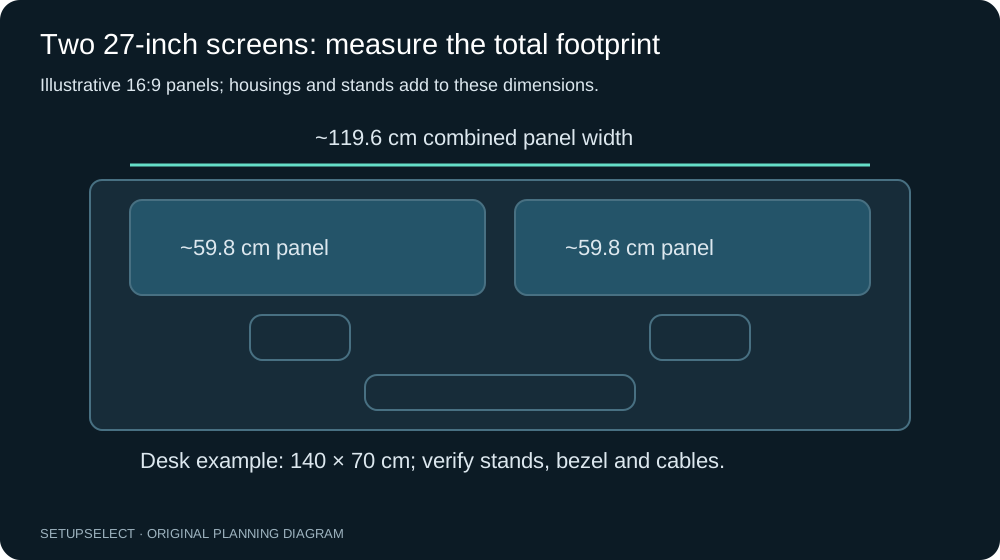
A screen's advertised 27 inches describes the diagonal of the display area. For a flat 16:9 panel, the calculated active width is approximately 59.8cm and the height approximately 33.6cm.
Two such display areas placed in a straight line occupy about 119.5cm before adding bezels, a central gap or any edge allowance. The finished monitor housing is normally larger than the active image.
That calculation explains why “two 27-inch monitors fit on a 120cm desk” can be technically plausible yet practically disappointing. There is almost no spare width in the idealised arithmetic.
The real housings may extend beyond the desktop; speaker placement or an open laptop can make the arrangement substantially wider. An overhanging screen is not automatically unsafe, but nearby doors, walkways and the support arrangement need consideration.
Use the manufacturer's width without the stand for each monitor, then record the stand's own footprint separately. Do not substitute shipping-box dimensions or assume two different 27-inch models have identical housings.
A widescreen 21:9 display advertised with a similar diagonal is a different shape and must be calculated separately.
A worked width calculation
Imagine two monitor housings, each 60cm wide, separated by a 2cm gap. Their straight-line span is 60 + 2 + 60 = 122cm. On a 140cm desk that leaves 18cm in total, or 9cm at each end if the pair is centred. On a 160cm desk, the same pair leaves 38cm in total.
These figures describe the screen arrangement only, not a required safety margin.
| Desk width | Space remaining around a 122cm screen span | What to investigate |
|---|---|---|
| 120cm | 2cm wider than the desktop | Overhang, arm position and nearby obstacles |
| 140cm | 18cm total | Mouse area, speakers and whether both screens need centring |
| 160cm | 38cm total | More lateral flexibility, but a larger room footprint |
You do not have to put every object in one horizontal line. A keyboard sits in front of the displays, and a closed laptop may sit elsewhere. Nevertheless, stacking these objects on a plan can hide depth problems.
Mark each item as a rectangle on paper, then check that objects which share the same area can genuinely occupy different heights without obstructing one another.
Angling the screens changes both width and depth
Turning the outer edges towards you reduces their projected width across the desk. For a simple model, projected width is the physical width multiplied by the cosine of the rotation angle.
Two 60cm housings each rotated 15 degrees project to about 116cm combined, before the centre gap. Adding a 2cm gap produces roughly 118cm.
That is not a free reduction. Each rotated screen also occupies more front-to-back space. A 60cm panel rotated 15 degrees has an approximately 15.5cm front-to-back projection from the panel alone.
The stand, arm and housing depth make the complete footprint different again. The actual junction between screens also depends on where the mounts pivot.
The dual-monitor desk calculator is useful for exploring this geometry. Treat its output as a starting sketch, then compare it with your measured housings and mounting hardware.
Avoid choosing an aggressive angle simply because it makes the width number turn green. The arrangement still needs to suit the way you read and switch between applications.
Depth is often the real limiting measurement
A broad desk can still feel cramped when it is shallow. List the objects that occupy the rear-to-front route: rear cable clearance, screen or stand projection, keyboard depth and the usable area towards the front edge.
Some footprints overlap vertically, so the sum is not always literal. A stand can extend beneath a display while the keyboard remains in front of it.
As a planning example, allow a 5cm rear service zone, a 24cm stand footprint and a 17cm keyboard, with 10cm remaining towards the front. The separate zones total 56cm.
A 60cm desktop leaves very little flexibility, whereas 80cm gives more options for adjusting screen position and writing space. These allowances are example inputs, not an ergonomic standard or a claim about a particular stand.
Measure eye-to-screen distance separately after sitting normally. Desk depth and viewing distance are not the same measurement: your eyes are usually in front of the desktop edge, and the screen may sit behind the stand's front edge.
The 60cm versus 80cm desk-depth guide shows how to keep these quantities separate.
Decide which screen belongs in front of you
For coding with documentation beside the editor, or accounts work with email on a second screen, one display often receives most attention. Start with that display in front of the working position, then place the secondary screen alongside it.
This can shift the pair away from the centre of the desk. Check that the mouse and chair still align with the main task rather than with the furniture's visual midpoint.
If both displays are used equally, a centred pair may be more convenient. The join will then sit close to the middle of your view. Try the intended arrangement with the windows and applications you actually use.
A beautiful symmetrical setup is not necessarily the easiest layout for a spreadsheet that stays open all day on one screen.
Portrait orientation is another option for documentation or messaging, but it changes the height requirement and mount behaviour. Verify rotation support, stand height and clearance above the desk before assuming it will solve a width problem.
A tall portrait screen can also be awkward beneath shelving or a sloping ceiling.
Stands versus a dual-monitor arm
The supplied stands have an important advantage: their compatibility with their own monitor is established by the manufacturer. They may, however, use much of the desktop and restrict how closely screens can be positioned.
Measure the widest and deepest parts of each base, including any legs that project towards the keyboard.
An arm can free working surface, but it transfers the problem to the clamp, desktop structure and movement envelope. Check the exact VESA pattern, each display's weight without its stand, the arm's supported range, and the desk thickness and material.
A stated maximum load alone does not establish compatibility. A hollow desktop or glass surface must not be assumed suitable for an ordinary clamp.
Some dual arms need considerable space behind the desk when their joints fold. If the desk sits against a wall, an apparently compact arm can push both screens towards you.
The monitor-arm compatibility guide and checker explain the evidence to gather before ordering.
Three realistic planning scenarios
First, consider a 120 × 60cm desk with two 27-inch screens and a closed laptop. Use measured monitor widths, not rounded diagonals, and test a modest angle.
If the screen arrangement overhangs the desktop, establish whether the supports remain fully secure and whether a person can knock a projecting corner while passing. The lack of spare desk depth may matter more than the small width overhang.
Second, consider a 140 × 70cm desk with the same displays, a compact keyboard and a mouse. The example 122cm straight screen span leaves 18cm total at the sides.
The extra depth makes it easier to separate input devices from stand legs, but an open 35cm laptop alongside the pair will not fit into that remaining strip.
A laptop riser behind another object is only useful if access, ventilation and visibility remain acceptable.
Third, consider a 160 × 80cm desk shared between computer work and paper documents. The wider surface gives useful flexibility, but first check the room.
If the additional depth reduces chair movement or blocks a wardrobe, the smaller desk may be the better overall setup. The right desk is the one that works as part of the room, not the one with the largest advertised surface.
Check the room and the underside
Measure the wall at desktop height and again near the floor. Skirting boards, radiator valves, curtains and cable outlets can reduce usable space. Draw the chair in its occupied and pulled-back positions, then open every nearby door and drawer.
A desk that fits perfectly between walls may prevent access to a socket or leave no space to assemble its frame.
Underneath, check the clear opening between legs, drawers, crossbars and cable trays. A 160cm desktop does not necessarily provide 160cm of legroom. Monitor-arm clamps also need access below the rear edge; a frame rail can obstruct the lower clamp plate.
Check delivery dimensions separately from assembled dimensions, especially for stairs and tight hallway turns.
Rehearse the arrangement before buying
Make paper or cardboard templates for the monitor housings, bases, keyboard and laptop. Mark a desk boundary on an existing table or floor, using removable tape suitable for the finish. Keep each support footprint distinct from the screen outline.
This makes it easier to spot an arrangement that looks fine from above but leaves a stand leg outside its supporting surface.
Sit at a comparable height and run through a normal task sequence: typing, pointing, reading both screens, writing a note and reaching the controls. Include a webcam, microphone or speakers if they are genuinely part of the setup.
Check the position of sockets and allow cables to bend without tension. A five-minute layout rehearsal can reveal a problem that a product photograph conceals.
Questions that change the answer
Can two 27-inch monitors work on a 120cm desk? Sometimes, particularly with a carefully verified angled or arm-mounted arrangement. Their idealised active width is already nearly 120cm, so do not assume every pair will fit neatly with space to spare.
Actual housing, support and room measurements decide the answer.
Is a 160cm desk always better? No. It offers more lateral space but occupies more of the room and may cost more to deliver or move.
If your computer task fits a 140cm surface and the wider desk constrains access, extra width does not improve the whole workspace.
Will a monitor arm solve a shallow desk? It can remove bulky bases, but some arm geometries move the screens forwards or need rear clearance.
Verify the intended position against the exact arm drawing, clamp arrangement and desktop construction rather than assuming every arm saves usable depth.
Your measurement checklist and next step
- Record housing width, height and depth for both monitors.
- Record each stand footprint or the arm's mounting and movement requirements.
- Decide whether one screen is primary or both are used equally.
- Include keyboard, pointing area, laptop position and any writing space.
- Test room circulation, chair movement, socket access and underside obstructions.
- Check the exact product manuals, delivery route and returns arrangements before ordering.
Use the desk-space calculator for a broad planning estimate, then use the dual-monitor geometry tool with the actual display dimensions.
Compare eligible furniture through desk comparison. These tools narrow the shortlist; they do not certify structural strength or individual ergonomic suitability.
Try the layout with real tasks
A useful mock-up includes the work you actually perform. Put a document beside the keyboard, open the notebook you normally use and leave the phone where it charges.
If those ordinary objects push the mouse to the very edge, the layout is already too tight even if both screens technically fit.
For a video-call setup, mark the camera position and decide which screen will show the other participants. Sitting square to one display while repeatedly turning towards a second can feel different from the symmetrical arrangement in a product photograph.
Try both an equal pair and a main-screen-plus-secondary layout before choosing the desk.
Record the preferred arrangement with a photograph and a short list of dimensions. Keep the stand or arm configuration in that record: changing the support later can change the space requirement without changing either monitor.
This gives you a repeatable acceptance check when the desk arrives.
Method and sources
Screen dimensions and angled projections above are calculated geometry for stated illustrative inputs, rounded to sensible precision. They are not product measurements or personal testing results. Use manufacturer drawings for real housings and mounts.
The HSE workstation checklist provides a broader assessment framework; a desk-size calculation alone is not a complete workstation assessment.
Continue researching