Buying guide
60cm vs 80cm desk depth: what fits your workspace?
A 60cm-deep desk can work well for a laptop with separate input devices or a compact monitor arrangement. An 80cm desk gives more flexibility for bulky stands, larger displays, writing and moving equipment around.
Neither depth is automatically correct: the deciding measurements are usable surface, screen position, room circulation and the way you work.
Do not buy an 80cm desk solely because it sounds more ergonomic, or dismiss a 60cm desk solely because it is shallow.
A deep desk used badly can place the screen unnecessarily far away; a shallow one can work if the exact supports, cables and input devices fit. The following examples separate those measurements so you can compare them honestly.
What nominal desk depth does not tell you
The advertised depth normally describes the desktop from front to back. It does not tell you how much of that distance remains usable after a rear cable tray, monitor base, wall gap, rounded front edge or decorative shelf.
Some desks have a raised rear section which reduces the main working surface even though the headline depth looks generous.
Measure the uninterrupted area where the keyboard and pointing device can actually sit. Record any cut-outs, grommets and projecting accessories. If you intend to clamp an arm to the rear edge, check the underside and frame as well as the top.
The distance between the wall and the front edge can exceed the desktop depth once cable bends or arm movement are included.
The comparison is therefore between complete installed setups, not just two dimensions from a retailer's title. A 60cm desktop standing 10cm from the wall occupies a similar room depth to a 70cm desktop against it.
That difference matters when the room is shared with a bed, dining table or cupboard.
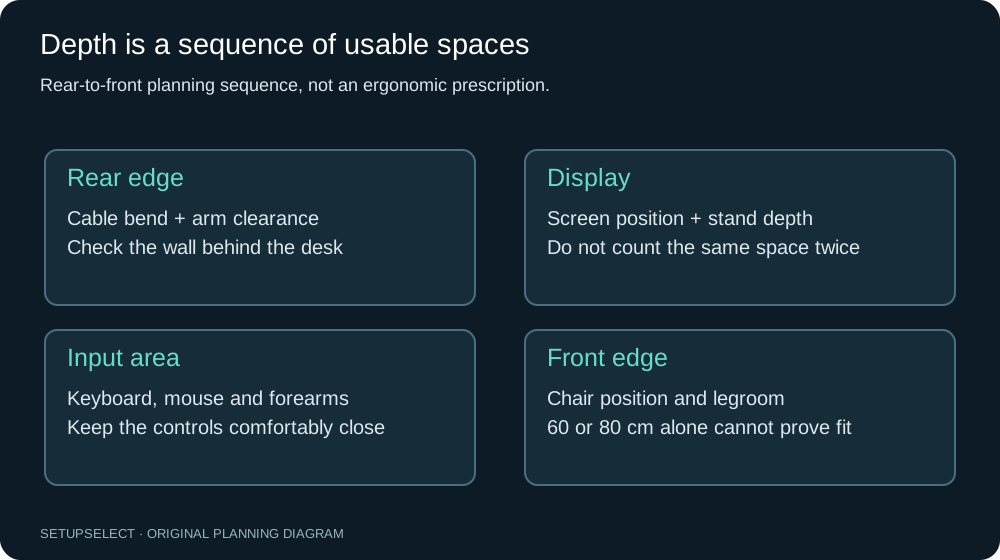
Build a rear-to-front space budget
Divide the surface into practical zones. At the back are plugs, cable bends and any wall gap. Next are the monitor support and the screen position. In front are the keyboard and pointing area, then the space you need near the desk edge.
These are planning zones, not prescribed body-position measurements.
For a simple non-overlapping example, use 5cm for rear servicing, 24cm for a monitor stand, 17cm for a keyboard and 10cm towards the front edge. The total is 56cm. On a 60cm desk only 4cm remains to absorb differences between the assumed and real equipment.
On an 80cm desk there is 24cm of flexibility, which could be used for repositioning or a document rather than pushed entirely behind the screen.
Some real footprints overlap: a monitor rises above its stand and an arm may leave clear space beneath it. Draw those overlaps deliberately.
Do not add every product's depth blindly, but do not assume overlap is possible when a stand leg or laptop hinge physically blocks the keyboard either.
| Planning feature | 60cm desk | 80cm desk |
|---|---|---|
| Compact keyboard and modest stand | Often workable after measuring | More positioning flexibility |
| Deep monitor base | Can dominate the surface | Easier to accommodate, not guaranteed |
| Paperwork in front of the screen | Often requires moving devices | More scope for a separate task area |
| Tight bedroom circulation | Smaller furniture footprint | May consume valuable chair or walking space |
| Rear-folding monitor arm | Check wall gap carefully | Still requires arm-specific checks |
Viewing distance is not desk depth
Your eye-to-screen distance runs from your seated eye position to the display surface. The front edge of the desk is not the starting point, and the rear edge is not necessarily the screen position.
Two people at the same 60cm desk can have different viewing distances because their chair position, screen stand and working posture differ.
As an illustrative geometry exercise, imagine the screen surface is 45cm behind the front edge and your eyes are 20cm in front of that edge. The horizontal separation is about 65cm.
Move the screen 10cm forwards and the horizontal separation becomes about 55cm, even though the desk itself has not changed. Real eye-to-screen distance also includes any height difference.
Use your normal working position when measuring. Do not lean backwards just to make the ruler produce a preferred number. Check text size, glare and application scaling as well as distance.
The monitor-size calculator gives a planning context, while a full workstation assessment addresses factors a distance calculator cannot.
A 60cm desk with a laptop
A laptop used directly on the desktop has coupled screen and keyboard positions. Raising the laptop improves one dimension but moves its built-in keyboard too.
For longer desk sessions, a separate keyboard and pointing device let you position the input devices independently.
The laptop setup guide explores three configurations rather than assuming a monitor purchase is always necessary.
On a 60cm surface, first measure the stand or riser footprint, including feet and the open laptop's rearward projection. Put the external keyboard where you naturally use it and check whether it collides with the stand.
Verify that the laptop vents and ports remain accessible. A very high stand is not useful if its legs occupy the entire pointing area.
A closed-laptop arrangement may free surface, but only if the laptop manufacturer supports that operating mode and cooling remains unobstructed. A vertical dock should not be treated as universally compatible.
Account for the charger, video cable and any docking-station power supply before deciding that the laptop has effectively disappeared from the space budget.
A 60cm desk with a 27-inch monitor
A 27-inch label describes the diagonal, not the depth of the support. One monitor may have a compact circular base while another uses wide angled feet extending towards the keyboard.
Look for dimensions with the stand attached, then study the shape in the manufacturer's drawing. The outline matters as much as the total depth.
Try centring the keyboard on the main display and check both pointing directions if you change hands or share the desk. A stand that leaves room for a keyboard may still intrude into the mouse sweep.
Speakers, a webcam support or a desk microphone introduce additional footprints which should be included before ordering furniture.
An arm may be useful, but its effect depends on the joints. Some need rear space when the monitor is brought close to the mounting point.
Check the monitor-arm compatibility guide before treating an arm as a guaranteed solution to a shallow desk. Always verify desk material and mounting requirements.
An 80cm desk for mixed computer and paper work
The practical benefit of a deeper surface is often the ability to change tasks without dismantling the setup. You might keep a notebook beside the keyboard, move a document in front of the display, or use a larger pointing area.
Decide which of those activities actually happens during your day rather than filling every spare centimetre with accessories.
Consider a 140 × 80cm desktop used for spreadsheets and handwritten notes. Place the display and keyboard first, then introduce the notebook at its open size. Check whether you can read it without twisting around a stand.
If the paperwork always sits beside the keyboard, extra width may be more useful than extra depth; compare the 120, 140 and 160cm width examples.
Do not push everything to the back simply because the desk is deep. Frequently used controls and input devices should remain accessible. A cable tray or desk shelf may help organisation, but it should not force the primary task into an awkward position.
Mark the useful working zone before buying storage that consumes it.
Calculate the room cost of extra depth
Moving from 60cm to 80cm adds 20cm to the furniture footprint if the rear position stays unchanged. In a room 240cm deep, a 60cm desk leaves 180cm before accounting for other furniture; an 80cm desk leaves 160cm.
If a 90cm-deep storage unit stands opposite, the remaining gap becomes 90cm or 70cm respectively. These are example clearances, not accessibility requirements.
Now include the occupied chair, the motion needed to stand up and any opening drawers. A gap that allows someone to sit may not allow another person to pass. Door swings and cupboard access should be drawn in their open positions.
If the desk projects into the only route through the room, the whole layout may need changing rather than trimming a few centimetres from the chair.
The workspace fit planner and room visualiser can help sketch the arrangement. Their plans do not certify accessibility, escape routes or structural suitability.
Measure the real room and preserve required access rather than treating a simple green result as permission to obstruct it.
Standing desks and moving equipment
A standing desk adds another dimension: the equipment moves vertically while wall sockets and nearby furniture may not. Measure cable paths at the highest and lowest intended positions.
Leave service loops where movement occurs, and ensure no cable becomes a tensioned support for a monitor, dock or power strip.
Check whether the monitor arm, microphone arm or raised laptop approaches shelving when the desk rises. A deeper desktop can make an overhead collision easier to miss because the equipment is farther back.
Also check that a rear cable tray does not hit a windowsill or radiator as the frame moves.
Plan the route before attaching clips or trays. The small-desk cable-management guide includes a movement-first approach.
Electrical connections should remain accessible and equipment ventilation should not be sacrificed to hide every wire.
A practical comparison exercise
Before ordering, mark two front edges on a table or floor: one representing 60cm from the proposed rear boundary and the other 80cm. Put templates of your actual support bases and input devices inside each outline.
Mark the screen surface separately from the base because it is the screen position that determines viewing geometry.
Use the same equipment in both trials. Changing to a compact keyboard in one and a full-size keyboard in the other makes the comparison less useful unless that change is part of the purchase plan.
Record which tasks work without moving equipment, which require a quick reset and which remain awkward.
Then repeat the room test with the chair occupied and pulled back. Check socket access, cleaning and the delivery route. An 80cm desktop that will not turn through the stairwell is not a usable upgrade.
Ask for package dimensions and assembly requirements rather than assuming that all desks arrive flat and compact.
Common buying mistakes
One mistake is treating monitor diagonal as a stand-depth specification. Another is measuring a bare wall while ignoring curtains, plugs and the arm joint that will sit behind the screen.
A third is assuming that a keyboard can slide under a monitor base even though the keys, cable or hands need the same space.
It is also easy to optimise the desk while making the room worse. A deeper surface may solve a document problem but remove the ability to open a wardrobe.
If the room is genuinely tight, consider changing the equipment arrangement or separating occasional paperwork from the permanent computer zone rather than automatically buying the deepest desk.
Questions to settle before checkout
Is 60cm enough for a 32-inch display? The size alone cannot answer that. Measure its stand, intended screen position and your actual working view. Resolution and text scaling also influence how you use the display.
Avoid a blanket recommendation based only on diagonal size.
Does 80cm mean I can skip a monitor arm? Possibly, but an arm may still be useful for adjustment or freeing surface. Conversely, the supplied stand may already do everything you need.
Choose mounting hardware for a specific constraint rather than as an automatic accessory.
Should I choose width or depth first? Begin with the maximum room footprint and the task that is hardest to fit. Dual monitors often expose width constraints, while large bases and mixed paperwork expose depth constraints.
Both still need to be checked together.
Next step and evidence
Run the desk-space calculator with a 140 × 60cm example, then change depth to 80cm and compare the result with your own templates.
Read the chair and desk measurement guide before comparing product dimensions. All numerical layouts in this article are illustrative calculations, not personal testing or universal minimums.
For a wider assessment framework, consult the HSE display-screen workstation checklist.
Continue researching