Buying guide
Beginner home gym without a garage: choose equipment in stages
A beginner home gym starts with a repeatable session and a place to put the equipment afterwards. You do not need a dedicated garage, a rack or a machine for every movement.
You do need suitable instruction, enough operating space and equipment whose resistance, adjustment and storage match your current ability and the next sensible stage of progression.
This is an equipment decision guide, including the staged resistance advice formerly covered by a separate starter-kit article. It is not an individual training prescription.
If you have an injury, a health condition, are returning after a significant break or are unsure what activity is appropriate, seek suitable professional guidance before choosing a programme or load.
Start with the reason you want to train at home
Write a specific purpose: becoming more consistent with strength sessions, adding short movement breaks, supporting an established sport or having an indoor option when outdoor exercise is impractical. “Build a complete gym” is a shopping goal; it does not tell you which equipment will be used on Tuesday evening.
Choose realistic session opportunities. If the room is available for twenty minutes before dinner, equipment requiring fifteen minutes of furniture moving may be a poor fit. If you prefer longer sessions at the weekend, slower plate changes may matter less.
The schedule and setup routine influence the best equipment format as much as the exercise catalogue does.
The NHS exercise hub provides guidance and routines for different needs.
Its strength-exercise page includes home-based options and advises building gradually. Use those resources or appropriate coaching to establish the activity; then choose equipment that supports it.
Turn the programme into equipment requirements
For each planned exercise, record whether it uses bodyweight, a band, a free weight or a dedicated support. Note the starting resistance and how the programme intends to progress.
You do not need a product for every muscle group; one suitable resistance system may support several movements.
Distinguish a required support from a convenient accessory. A bench may be necessary for a particular version of an exercise, while an appropriately instructed alternative may not require one.
Do not improvise a loaded exercise on ordinary furniture because a video uses a bench you have not bought.
Also record transitions. A session alternating between two loads may need frequent adjustments. One person training alone has different needs from two people sharing equipment at different strengths.
A list of maximum weights misses these practical constraints.
Choose a first resistance format
| Format | Useful starting advantage | Limitation to plan around |
|---|---|---|
| Bodyweight | Minimal equipment and storage | Progression may require changes in leverage, support or exercise selection |
| Resistance bands | Compact and portable | Resistance changes with stretch; anchors and condition matter |
| Fixed dumbbells | Clear, quick load selection | More weights require more storage |
| Plate-loaded handles | Visible plate combinations and potential flexibility | Collars and changes take time; compatibility is essential |
| Selector dumbbells | Several loads in a compact system | Mechanisms, cradles and handling restrictions are model-specific |
The table is not a ranking. Choose the format that fits the actual session and your ability to use it correctly. Bands and dumbbells feel different even when a seller gives both a kilogram figure.
Do not compare those figures as though they represent identical resistance through every movement.
Use the dumbbells-versus-bands tool to organise the trade-offs. If possible, try the format under suitable instruction before committing to a large purchase.
Familiarity with adjustment and handling can be more useful than an impressive list of included accessories.
Buy a useful range, not the largest number
A beginner's equipment needs an appropriate starting setting as well as room to progress. A set with a high maximum may start too heavy for some movements or offer jumps that are too large.
Write down the selectable settings, including the handle and collar weight where relevant.
For an illustrative comparison, a system offering 4, 6, 8 and 10kg settings behaves differently from one offering 4, 5, 6 and 7kg before continuing higher. Neither pattern is universally better.
The appropriate increments depend on the exercise, your current ability and the programme. The point is to compare the complete ladder rather than the top rung.
Confirm whether a quoted weight is per dumbbell, for a pair or for the whole package. A “20kg set” could mean a combined collection of handles and plates. It does not necessarily provide two independently adjustable 20kg dumbbells.
The adjustable-dumbbell guide explains the product-level checks.
Progression has limits beyond resistance
Progress can involve suitable changes to repetitions, sets, movement range, control or exercise difficulty as well as load, according to the programme and instruction you follow. That does not mean every light piece of equipment remains useful indefinitely.
Eventually the available resistance, support or movement options may become the limiting factor.
Keep a simple record of what you used and how the session went. When considering an upgrade, identify the exact constraint: the next load jump is too large, the maximum is insufficient for a planned movement, or changing plates repeatedly disrupts the session.
A named limitation leads to a more useful purchase than a vague sense that beginners should own more gear.
Do not compensate for inadequate equipment by using unsupported attachments, unstable furniture or an adjustment outside the instructions.
It may be more appropriate to change the programme with qualified help, save for suitable equipment or use another training location for certain movements.
Establish the floor area before ordering
Measure both the equipment and your movement around it. Include reaching down to pick up a weight, returning it to its supported position, changing plates and getting onto or off any support.
Check the ceiling for overhead movements and the route through doors. A mat's printed dimensions are not a complete exercise clearance specification.
Use an unloaded rehearsal where appropriate and mark the intended area without damaging the floor. Follow equipment and exercise guidance rather than inventing a universal safe margin.
The home-gym space planner and worked room guide help separate stored, operating and access space.
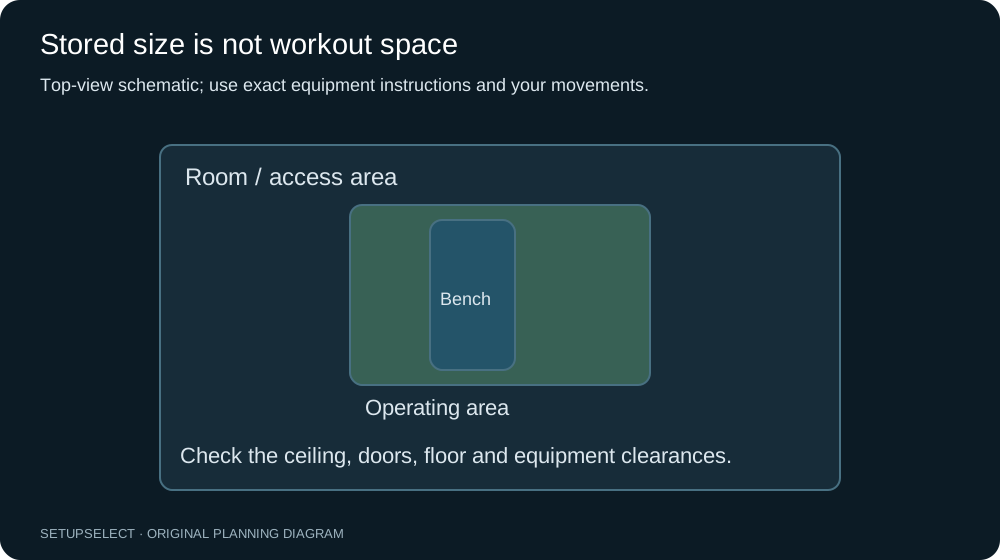
The illustrated bench represents the footprint principle, not a required beginner purchase. A resistance-band session or simple floor routine also needs enough room for the intended movements.
Remove trip hazards and keep children and pets outside the active area.
Use supports and anchors only as intended
A band anchor is part of the exercise system. Check its compatibility with the band, the permitted fixing arrangement and the condition of the supporting structure. Follow the exact instructions for doors or other mounting locations.
A handle, pipe, radiator or lightweight furniture leg is not a substitute merely because a band can be looped around it.
Inspect bands for damage according to their instructions, including areas that rub or stretch repeatedly. Store them as directed, away from conditions that the manufacturer says can degrade the material.
Do not continue using a visibly damaged band to avoid a small replacement cost.
For chair-based exercises, the NHS specifies a solid, stable chair without wheels that will not slip. That guidance applies to those exercises; it does not turn a household chair into a rated weight bench or support for every movement.
Keep the intended use of each support clear.
Stage one: establish the habit with minimal equipment
Begin with the suitable routine and clear space already available. Add a mat only if the activity and surface require it, choosing the correct size and grip rather than a generic thick product.
If the programme requires resistance, select the smallest complete system that provides the appropriate settings and instructions.
Rehearse the setup sequence before the first full session. Put equipment in its working position, check mechanisms and return it to storage.
This reveals missing floor protection, inaccessible cupboards or an awkward carrying route without turning the first workout into an assembly project.
Retain receipts, manuals and model details. Check included parts before discarding packaging. If the equipment cannot be adjusted or secured with confidence, resolve the problem with the supplier rather than training around it.
Stage two: respond to actual use
After several sessions, review the repeated friction points. Perhaps a single band is too large a resistance jump, loose plates take too long to organise or the mat slides during the intended movement.
These observations may justify a small targeted improvement rather than a new equipment category.
Keep spending tied to the routine. A weight stand might improve retrieval and organisation, but it also consumes space and must be appropriate for the equipment. A bench might expand useful exercise options, but only if those options are part of the plan.
The £150 small-flat guide provides itemised allocations with money deliberately held back.
If you have not been using the equipment, examine the schedule and setup burden before upgrading. More equipment will not automatically solve a session that does not fit household life.
A simpler storage location or a different time of day may be the more useful change.
Stage three: add specialised equipment when justified
A cardio machine, bench or heavier resistance system becomes easier to evaluate once you know how you train. You can describe the sessions it will support, the required settings and the available operating area.
That makes retailer specifications meaningful instead of a list of features to guess about.
Check delivery, assembly, maintenance, user limits and return arrangements before ordering a large item. The compact-cardio guide compares operating and stored space.
The bench model-comparison guide explains why a brand name alone does not identify a particular bench's limits.
Consider whether occasional access to another training location would serve a specialised need more practically than permanently storing equipment at home. A home gym can support most of your routine without being required to reproduce every facility.
Build a setup and pack-away routine
Give each item an identified storage position that follows its instructions. Keep heavy objects in suitable supported locations and small adjustment parts together. Do not leave weights where feet, doors or children can reach them unexpectedly.
Make the route from storage to training area clear before carrying anything.
An illustrative routine might be: clear the area, lay the suitable mat, inspect the resistance equipment, place it in the working zone and begin the planned warm-up. Afterward, clean and dry as instructed, inspect for damage and return each component.
The details vary, but the sequence should be simple enough to repeat when motivation is ordinary.
Store equipment in permitted orientations. A folding label does not automatically authorise upright storage against a wall. Keep locks, pins and cradles accessible for inspection.
If putting equipment away requires an awkward lift you cannot manage, reconsider the storage arrangement before continuing.
Understand what flooring and quiet handling can do
The flooring guide distinguishes exercise comfort, equipment stability and protection of the existing finish. A soft mat may help floor work while being unsuitable beneath a concentrated machine foot.
Confirm compatibility with both the equipment and the underlying floor.
For upstairs rooms, use the quiet-home-gym guide. Flooring does not automatically eliminate vibration or establish structural capacity.
Controlled handling and a routine appropriate to the building remain central. Follow restrictions on dropping adjustable weights even if a thick surface is present.
Household coordination also matters. Agree workout times, preserve shared routes and pack away equipment reliably.
A small kit can integrate into a living room when its use is predictable; a permanently scattered kit can make even a generous room feel unusable.
Beginner equipment questions
Do I need a matching set of accessories? No. Compatibility matters where parts interact, but matching colours and branding do not create a better routine. Buy a complete, supported resistance system and add accessories only for an identified function.
Can I use one dumbbell instead of a pair? Some appropriately instructed routines use one, while others require a pair. Follow the programme and confirm what the product listing includes. Do not buy one accidentally because the photograph shows two.
When is a bench worth adding? When the intended supported movements justify its space and cost, and the exact bench suits the user and loads. If the current routine works without one, it can wait.
How do I avoid outgrowing a starter kit immediately? Check the minimum, increments, maximum and supported expansion path before buying. Keep expectations tied to the programme and review actual use.
No compact kit can promise unlimited progression for every exercise.
What should I do if exercise causes concerning symptoms? Stop and seek appropriate medical advice rather than changing equipment to work around them. Equipment planning cannot determine the cause or establish that continuing is safe.
Use professional guidance for health questions and manufacturer instructions for equipment operation.
Continue researching